A quick article about a maintenance task for Oracle Exadata when you are using OVM and you divided your storage cell disks for every VM. Here I will show you how to extend your Grid Disks to add more space in your ASM diskgroup.
A quick article about a maintenance task for Oracle Exadata when you are using OVM and you divided your storage cell disks for every VM. Here I will show you how to extend your Grid Disks to add more space in your ASM diskgroup.
The first thing is being aware of your environment, before everything you need to know the points below because, they are important to calculate the new space, and to avoid do something wrong:
- Number of cells in your appliance.
- Number of disks for each cell.
- Mirroring for your ASM.
- The VM that you want to add the space.
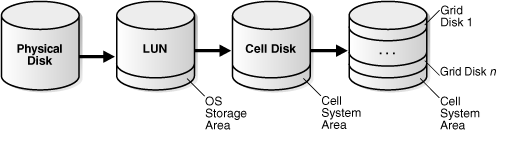
The “normal” Exadata storage cell has 12 disks, the Extreme Flash version uses 8 disks per storage. If you have doubt about how many disks you have per storage cell, you can connect in each one and check the number of celldisks you have. And before continuing, be aware of Exadata disk division:
To do this change we execute three major steps: ASM, Exadata Storage, and ASM again.
Inside ASM we can use this query to collect some information about the diskgroups:
SQL> col name format a12 head 'Disk Group';

SQL> col total_mb format 999999999 head 'Total GB|Raw';

SQL> col free_mb format 999999999 head 'Free GB|Raw';

SQL> col avail_mb format 999999999 head 'Total GB|Usable';

SQL> col usable_mb format 999999999 head 'Free GB|Usable';

SQL> col usable_mb format 999999999 head 'Free GB|Usable';

SQL> col cdisks format 99999 head 'Cell|Disksl';

SQL>

SQL> select a.name,a.total_mb,a.free_mb,a.type,

  2  decode(a.type,'NORMAL',a.total_mb/2/1024,'HIGH',a.total_mb/3/1024) avail_mb,

  3  decode(a.type,'NORMAL',a.free_mb/2/1024,'HIGH',a.free_mb/3/1024) usable_mb,

  4  count(b.path) cdisks

  5  from v$asm_diskgroup a, v$asm_disk b

  6  where a.group_number=b.group_number

  7  group by a.name,a.total_mb,a.free_mb,a.type,

  8  decode(a.type,'NORMAL',a.total_mb/2/1024,'HIGH',a.total_mb/3/1024) ,

  9  decode(a.type,'NORMAL',a.free_mb/2/1024,'HIGH',a.free_mb/3/1024)

 10  order by 2,1

 11  /

               Total GB    Free GB          Total GB    Free GB   Cell

Disk Group          Raw        Raw TYPE       Usable     Usable Disksl

------------ ---------- ---------- ------ ---------- ---------- ------

RECOC3          4239360    2465540 NORMAL       2070       1204     60

DATAC3         15790080    2253048 NORMAL       7710       1100     60

SQL>

SQL> select dg.name, d.failgroup, d.state, d.header_status, d.mount_status, d.mode_status, count(1) num_disks

  2  from v$asm_disk d, v$asm_diskgroup dg

  3  where d.group_number = dg.group_number

  4  and dg.name IN ('DATAC3')

  5  group by dg.name, d.failgroup, d.state, d.header_status, d.mount_status, d.mode_status

  6  order by 1,2,3;

NAME   FAILGROUP                      STATE    HEADER_STATU MOUNT_S MODE_ST  NUM_DISKS

------ ------------------------------ -------- ------------ ------- ------- ----------

DATAC3 EXACELADM01                    NORMAL   MEMBER       CACHED  ONLINE          12

DATAC3 EXACELADM02                    NORMAL   MEMBER       CACHED  ONLINE          12

DATAC3 EXACELADM03                    NORMAL   MEMBER       CACHED  ONLINE          12

DATAC3 EXACELADM04                    NORMAL   MEMBER       CACHED  ONLINE          12

DATAC3 EXACELADM05                    NORMAL   MEMBER       CACHED  ONLINE          12

SQL>
With that, I have three important information: number the disks (60), redundancy type (NORMAL), total actual size (RAW value – 15790080). To discover the size for each disk in ASM (here I do manually and not check in v$asm_disk just to show you the steps and to be more didact) you can divide the raw space/#disks:
SQL> SELECT (15790080/1024)/60 as gbDISK FROM dual;

    GBDISK

----------

       257

SQL>
So, each disk has 257GB of space size (in raw). Since the actual free space is 1100GB (1.07TB) and we want to add more 2TB we need to increase the value for each disk.
The formula is simple: NewValue(inGB)*#OfDisksPerCell*#NumberofCells. Here I choose 330GB per disk, so, the new size for diskgroup will be:
SQL> SELECT (330*12*5) AS newsizeGB FROM dual;

 NEWSIZEGB

----------

     19800

SQL>
But this value is not correct because does not consider the mirror type, so, we need to divide this value. If it NORMAL, divide by 2, if HIGH, divide by 3. To compare, the old and new expected value:
SQL> SELECT (257*12*5)/2 as actualsizeGBUsable, (330*12*5)/2 AS newsizeGBUSable FROM dual;

ACTUALSIZEGBUSABLE NEWSIZEGBUSABLE

------------------ ---------------

             7710            9900

SQL>
So, the new total space for diskgroup will be around 9.6 TB (9900 GB). And we will add (as free space) around 2.1 TB. Probably you need to execute these formulas more than one time to find the desired size per disk.
I start to calculate by disk (and after discovering the final diskgroup size) instead of starting with diskgroup size (and dividing to discover the disk size) because doing this way, the size for disk will be always correct and align with storage cell grid disk. Remember that grid disks are aligned in 16MB and, if you start to choose one arbitrary value to the max size for the ASM diskgroup, you can reach a value per grid disk that is not 16MB aligned. As an example, if I start choosing 20TB for diskgroup, the size per disk will be (20*1024)/60 = 341.33GB and this is not aligned with 16MB.
For 16 Mb explanation, you can check in the Exadata docs:
Find the closest 16 MB boundary for the new grid disk size. If you do not perform this check, then the cell will round down the grid disk size to the nearest 16 MB boundary automatically, and you could end up with a mismatch in size between the Oracle ASM disks and the grid disks.
In the Exadata side, first, check some info about the actual state for grid disks. Here I connect in one cell (if you want you can use dcli to call every/all cells) and check some info for the grid disk:
[root@exaceladm01 ~]# cellcli

CellCLI: Release 18.1.6.0.0 - Production on Fri Jun 21 16:57:49 CEST 2019

Copyright (c) 2007, 2016, Oracle and/or its affiliates. All rights reserved.

CellCLI> list celldisk

         CD_00_exaceladm01       normal

         CD_01_exaceladm01       normal

         CD_02_exaceladm01       normal

         CD_03_exaceladm01       normal

         CD_04_exaceladm01       normal

         CD_05_exaceladm01       normal

         CD_06_exaceladm01       normal

         CD_07_exaceladm01       normal

         CD_08_exaceladm01       normal

         CD_09_exaceladm01       normal

         CD_10_exaceladm01       normal

         CD_11_exaceladm01       normal

         FD_00_exaceladm01       normal

         FD_01_exaceladm01       normal

         FD_02_exaceladm01       normal

         FD_03_exaceladm01       normal

CellCLI> list celldisk CD_02_exaceladm01 detail

         name:                   CD_02_exaceladm01

         comment:

         creationTime:           2016-11-29T10:23:35+01:00

         deviceName:             /dev/sdc

         devicePartition:        /dev/sdc

         diskType:               HardDisk

         errorCount:             0

         freeSpace:              2.6688079833984375T

         id:                     d57b31bb-6043-4cea-b992-ef8075f42e77

         physicalDisk:           PUT81V

         size:                   7.152252197265625T

         status:                 normal

CellCLI>

CellCLI> list griddisk where name like 'DATAC3.*';

         DATAC3_CD_00_exaceladm01        active

         DATAC3_CD_01_exaceladm01        active

         DATAC3_CD_02_exaceladm01        active

         DATAC3_CD_03_exaceladm01        active

         DATAC3_CD_04_exaceladm01        active

         DATAC3_CD_05_exaceladm01        active

         DATAC3_CD_06_exaceladm01        active

         DATAC3_CD_07_exaceladm01        active

         DATAC3_CD_08_exaceladm01        active

         DATAC3_CD_09_exaceladm01        active

         DATAC3_CD_10_exaceladm01        active

         DATAC3_CD_11_exaceladm01        active

CellCLI>

CellCLI> list griddisk where name = 'DATAC3_CD_04_exaceladm01' detail;

         name:                   DATAC3_CD_04_exaceladm01

         asmDiskGroupName:       DATAC3

         asmDiskName:            DATAC3_CD_04_EXACELADM01

         asmFailGroupName:       EXACELADM01

         availableTo:

         cachedBy:               FD_00_exaceladm01

         cachingPolicy:          default

         cellDisk:               CD_04_exaceladm01

         comment:                "Cluster exa-cl3 diskgroup DATAC3"

         creationTime:           2017-01-20T17:23:21+01:00

         diskType:               HardDisk

         errorCount:             0

         id:                     2cb2aecb-cfa1-4282-b90d-3a08ed079778

         size:                   257G

         status:                 active

CellCLI>
Here you can see that I checked:
- The celldisks info for this cell.
- Detail for one celldisk (look the freeSpaceattribute to verify if you have free space).
- The grid disks for this cell.
- Details for the griddisk (look that the size is the same value that I calculated manually).
This part was just to check and show you how to verify some info, with time, you don’t need to check this in every maintenance (because you will be familiar with the environment). Be careful that, if you have different grid disk space division per storage cells, you need to check if you have available space in all your storage celldisks.
To expand the grid disks you have two options, enter in each cell and expand manually one by one, or create one script and call by dcli (the option that I choose). So, create one script that executes the ALTER GRIDDISK command for the new desired size. Just remember to be careful and choose the correct grid disks (here is for VM 03, that means DATAC3):
[DOM0 - root@exadbadm01 tmp]$  vi Change_Disk_Size_Of_DATAC3_Cluster_To_330G.sh

[DOM0 - root@exadbadm01 tmp]$

[DOM0 - root@exadbadm01 tmp]$

[DOM0 - root@exadbadm01 tmp]$  cat Change_Disk_Size_Of_DATAC3_Cluster_To_330G.sh

dcli -l root -c exaceladm01 cellcli -e ALTER GRIDDISK DATAC3_CD_00_EXACELADM01 size=330G;

dcli -l root -c exaceladm02 cellcli -e ALTER GRIDDISK DATAC3_CD_00_EXACELADM02 size=330G;

…

dcli -l root -c exaceladm02 cellcli -e ALTER GRIDDISK DATAC3_CD_11_EXACELADM02 size=330G;

dcli -l root -c exaceladm03 cellcli -e ALTER GRIDDISK DATAC3_CD_11_EXACELADM03 size=330G;

dcli -l root -c exaceladm04 cellcli -e ALTER GRIDDISK DATAC3_CD_11_EXACELADM04 size=330G;

dcli -l root -c exaceladm05 cellcli -e ALTER GRIDDISK DATAC3_CD_11_EXACELADM05 size=330G;

[DOM0 - root@exadbadm01 tmp]$

[DOM0 - root@exadbadm01 tmp]$  chmod +x Change_Disk_Size_Of_DATAC3_Cluster_To_330G.sh

[DOM0 - root@exadbadm01 tmp]$

[DOM0 - root@exadbadm01 tmp]$  ./Change_Disk_Size_Of_DATAC3_Cluster_To_330G.sh

exaceladm01: GridDisk DATAC3_CD_00_exaceladm01 successfully altered

exaceladm02: GridDisk DATAC3_CD_00_exaceladm02 successfully altered

exaceladm03: GridDisk DATAC3_CD_00_exaceladm03 successfully altered

…

…

exaceladm01: GridDisk DATAC3_CD_11_exaceladm01 successfully altered

exaceladm02: GridDisk DATAC3_CD_11_exaceladm02 successfully altered

exaceladm03: GridDisk DATAC3_CD_11_exaceladm03 successfully altered

exaceladm04: GridDisk DATAC3_CD_11_exaceladm04 successfully altered

exaceladm05: GridDisk DATAC3_CD_11_exaceladm05 successfully altered

[DOM0 - root@exadbadm01 tmp]$

[DOM0 - root@exadbadm01 tmp]$
Above I cropped the output to reduce the size or post, but you can check the raw output here. After the change you can check the info for the grid disk:
[root@exaceladm01 ~]# cellcli

CellCLI: Release 18.1.6.0.0 - Production on Fri Jun 21 17:24:03 CEST 2019

Copyright (c) 2007, 2016, Oracle and/or its affiliates. All rights reserved.

CellCLI> list griddisk where name = 'DATAC3_CD_04_exaceladm01' detail;

         name:                   DATAC3_CD_04_exaceladm01

         asmDiskGroupName:       DATAC3

         asmDiskName:            DATAC3_CD_04_EXACELADM01

         asmFailGroupName:       EXACELADM01

         availableTo:

         cachedBy:               FD_00_exaceladm01

         cachingPolicy:          default

         cellDisk:               CD_04_exaceladm01

         comment:                "Cluster exa-cl3 diskgroup DATAC3"

         creationTime:           2017-01-20T17:23:21+01:00

         diskType:               HardDisk

         errorCount:             0

         id:                     2cb2aecb-cfa1-4282-b90d-3a08ed079778

         size:                   330G

         status:                 active

CellCLI> list celldisk CD_02_exaceladm01 detail

         name:                   CD_02_exaceladm01

         comment:

         creationTime:           2016-11-29T10:23:35+01:00

         deviceName:             /dev/sdc

         devicePartition:        /dev/sdc

         diskType:               HardDisk

         errorCount:             0

         freeSpace:              2.5975189208984375T

         id:                     d57b31bb-6043-4cea-b992-ef8075f42e77

         physicalDisk:           PUT81V

         size:                   7.152252197265625T

         status:                 normal

CellCLI> exit

quitting

[root@exaceladm01 ~]#
After you change the grid disks in the storage side, you can go back to ASM and extend the diskgroup:
SQL> ALTER DISKGROUP DATAC3 RESIZE ALL;

Diskgroup altered.

SQL>
And you can check that the size was already added (look that values hit what we calculated before):
SQL> select a.name,a.total_mb,a.free_mb,a.type,

  2  decode(a.type,'NORMAL',a.total_mb/2/1024,'HIGH',a.total_mb/3/1024) avail_mb,

  3  decode(a.type,'NORMAL',a.free_mb/2/1024,'HIGH',a.free_mb/3/1024) usable_mb,

  4  count(b.path) cdisks

  5  from v$asm_diskgroup a, v$asm_disk b

  6  where a.group_number=b.group_number

  7  group by a.name,a.total_mb,a.free_mb,a.type,

  8  decode(a.type,'NORMAL',a.total_mb/2/1024,'HIGH',a.total_mb/3/1024) ,

  9  decode(a.type,'NORMAL',a.free_mb/2/1024,'HIGH',a.free_mb/3/1024)

 10  order by 2,1

 11  /

               Total GB    Free GB          Total GB    Free GB   Cell

Disk Group          Raw        Raw TYPE       Usable     Usable Disksl

------------ ---------- ---------- ------ ---------- ---------- ------

RECOC3          4239360    2465540 NORMAL       2070       1204     60

DATAC3         20275200    6738128 NORMAL       9900       3290     60

SQL>
And you can check the v$asm_operation to check the rebalance progress:
SQL> select operation, EST_MINUTES, EST_RATE, EST_WORK, sofar from v$asm_operation;

OPERA EST_MINUTES   EST_RATE   EST_WORK      SOFAR

----- ----------- ---------- ---------- ----------

REBAL           0          0          0          0

REBAL           0      46158      18490       5761

REBAL           0          0          0          0

REBAL           0          0          0          0

REBAL           0          0          0          0

SQL>
As you can see, the steps to do that are simple and not complex, you just need to take care about some details of your environment: Number of the disks per cell, number the cells and the VM where you want to add the space is critical to do the correct change. Remember to align with 16MB the size of your grid disk, when you are adding it is not a big deal, but if you want to shrink this can break your ASM diskgroup.
Check that the only change effectively is the size of the grid disk, all the others occur automatically because of the grid disk. ASM diskgroup will increase to the max value that it is available and space is available just after the command.
The steps above are more detailed that you will do in daily maintenance, but help you to understand most of the details for this kind of change.
This article Increase size for Exadata Grid Disks was initially published on Fernando Simon’s Blog
Reference:
How to Resize Grid Disks in Exadata (Doc ID 2176737.1) – https://support.oracle.com/epmos/faces/DocContentDisplay?id=2176737.1
Resizing Grid Disks – https://docs.oracle.com/en/engineered-systems/exadata-database-machine/sagug/exadata-administering-asm.html#GUID-570A0C37-907C-4417-BC93-AC4ABAF7E3AD


